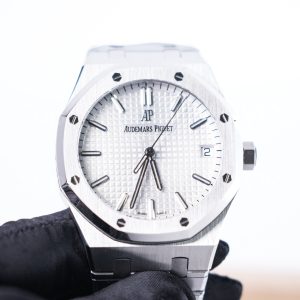
Your QC folder arrives with a straight-on dial photo, but the first decision is not obvious: should you inspect the octagonal bezel, the screw grooves, or the Tapisserie grid? Finding the best AP Royal Oak super clone starts one step earlier. Confirm the exact Royal Oak reference and the size you actually want, then review the visible details in a fixed order so one attractive photo does not hide a reference mismatch or a weak finishing area.
This page is a Royal Oak reference-and-QC guide, not a factory ranking and not an AP family overview. It focuses on the 37 mm, 39 mm and 41 mm Royal Oak directions, the dial and bezel details that separate them, the integrated bracelet, the functions appropriate to each reference type, and the photos needed before approval.
For broader catalog browsing outside this single series, return to the main super clone watches page. The model and QC decisions below remain specific to the Royal Oak.
Royal Oak Shortlist: Choose the Reference Before the Factory
A factory name cannot tell you whether a 37 mm selfwinding model, a 39 mm Jumbo-style model, a 41 mm three-hand model or a 41 mm chronograph belongs on your wrist. Those directions differ in visual scale, dial architecture, side profile and the number of functions that must be checked. Start with the reference family; only then ask which current version is available for that exact configuration.
The shortlist below uses reference directions rather than promising a specific batch or inventory position. It gives support a precise request and gives you a reference-specific QC priority instead of a vague request for the “best version.”
| Reference direction | Approx. case size | Wearing scenario | Primary QC risk | Best suited to |
|---|---|---|---|---|
| 15550-style selfwinding | 37 mm | Smaller-wrist daily wear, office use and a less dominant integrated-bracelet look | The case may still appear broad if the first bracelet links sit too rigidly; dial printing and date centering are also easy to notice at this scale | People who want Royal Oak geometry without making the watch the largest element of the outfit |
| 16202-style Jumbo | 39 mm | A classic, restrained profile that can move between a shirt cuff and casual clothing | Side-profile proportion, Petite Tapisserie execution and bracelet articulation must support the cleaner visual character | People who prioritize the Jumbo-style silhouette over maximum dial presence |
| 15510-style selfwinding | 41 mm | Modern daily wear with a larger dial and stronger bracelet presence | Bezel-to-dial balance, marker placement, date window and the transition from case to first links | People who deliberately want a current, more assertive three-hand Royal Oak direction |
| 26240-style chronograph | 41 mm | Sport-luxury wear where sub-dials and pushers are part of the intended visual weight | Sub-dial layout, pusher finish, hand reset, date placement and added case depth | People prepared to inspect more functions and accept a busier, stronger wrist presence |
Do not treat the rows as a universal ranking. A 37 mm reference can be the more convincing choice on one wrist, while a 41 mm reference can be correct for someone who wants the bracelet and bezel to read from across the room. The useful question is: which reference produces the intended proportion before any factory discussion begins?
After the reference is fixed, ask for the current factory and version information attached to that exact model, dial color and bracelet configuration. Broader production research belongs in the Super Clone Watch Factory Guide; this page keeps the decision at reference level.

15510ST-Style, 41 mm Green Dial
Use this product direction to judge modern 41 mm dial presence, bezel balance and the integrated steel bracelet.
Inspect the 15510ST-Style Page
16202ST-Style, 39 mm Jumbo
Use this product direction to inspect the cleaner 39 mm presentation, finer dial grid and bracelet-to-case proportion.
Inspect the 16202ST-Style Page
26240ST-Style, 41 mm Chronograph
Use this product direction when sub-dial spacing, pusher shape and chronograph operation are part of the choice.
Inspect the 26240ST-Style PageCase Size and Wrist Presence: 37 mm, 39 mm and 41 mm Logic
Royal Oak sizing cannot be judged from the diameter number alone. The octagonal case, broad bezel, integrated bracelet and relatively firm first links can make the watch occupy more wrist width than a conventional round watch with a separate strap. A useful size decision therefore needs three inputs: wrist circumference, the flat width across the top of the wrist, and how much visual presence you want from the bracelet.
37 mm: the controlled starting point
For a smaller wrist, a 37 mm Royal Oak direction is usually the safest place to begin because it reduces dial and bezel spread while preserving the integrated-bracelet identity. Do not approve it from a floating product image, though. Ask for a wrist-angle or curved-display photo that shows how the first links fall. If those links remain nearly horizontal before dropping, the watch can still look broader than expected.
39 mm: diameter restraint with Jumbo character
The 39 mm Jumbo-style direction is not simply a midpoint between 37 and 41. Its appeal is the cleaner reference profile, so the side view matters as much as the front diameter. Request a level side photo and inspect the case, bezel, crystal and caseback as one stack. A 39 mm watch that appears unnecessarily tall or has stiff first links can lose the restrained character that made you select this reference direction.
41 mm: choose it for presence, not because larger sounds better
A 41 mm selfwinding or chronograph makes the bezel, dial color and bracelet more prominent. That can work well on a medium-to-large wrist or for someone who intentionally wants a stronger sports-luxury result. It is less forgiving when the bracelet does not articulate cleanly or when the bezel-to-dial proportions look unbalanced. Chronograph pushers also add visual mass on the crown side, so a 41 mm chronograph should be reviewed from both side angles rather than treated like a three-hand 41 mm model.
Action before requesting QC: record your wrist circumference, photograph the top of your wrist from directly above, and state whether you want discreet, balanced or strong wrist presence.
That information is more useful than asking whether a size is “small” or “large” in isolation.
Tapisserie Dial, Markers and Date Window Checks
The Tapisserie grid should be checked against the selected reference, not against a general idea that a finer pattern is always better. A 16202-style Jumbo direction uses a different visual scale from the Grande Tapisserie associated with current 37 mm and 41 mm selfwinding directions. A chronograph adds counters that interrupt the grid, so the inspection must include how the pattern meets each sub-dial and date opening.
Begin with a straight-on image taken with the dial parallel to the camera. Wide-angle phone photos can stretch one side of the dial and make markers or the date window look displaced. If the first image is angled, request a second one before classifying the watch.
- Grid consistency: follow several horizontal and vertical rows. The squares should retain a consistent scale and should not appear blurred, merged or abruptly compressed near the dial edge.
- Reference-appropriate texture: confirm whether the target calls for a Petite or Grande Tapisserie presentation. Do not approve a dial merely because the texture looks deep in one high-contrast photo.
- Applied markers: compare opposite markers as pairs. Check that they sit at consistent angles, that the 12 o’clock marker is centered, and that no marker appears lifted at one end.
- Hands and clearance: look for clean hand edges and adequate separation between the hands, markers and dial. A short video helps reveal contact or uneven movement that a still image cannot show.
- Logo and minute track: lettering should appear level and clean at normal magnification. Extreme digital zoom can create compression artifacts, so ask for a closer source photo rather than judging a pixelated crop.
- Date window: inspect the opening, frame and displayed numeral together. The date should appear centered enough to read cleanly; ask for another date if the first numeral naturally sits asymmetrically.
Dial color should be reviewed under at least two lighting conditions when possible. Blue, green, grey and black can shift dramatically under direct light, and a highly saturated catalog image is not a substitute for a neutral QC photo of the actual watch.
Octagonal Bezel Geometry and Screw Alignment
The Royal Oak bezel is a connected geometry test. The eight sides, eight corners, brushed top surface, polished bevel and visible hexagonal fittings must look coherent as one frame. Inspecting one screw at maximum zoom while ignoring the bezel shape can miss a larger problem; approving the whole bezel from a distant photo can hide a rotated groove or uneven seating.
The visible front elements are held in hexagonal openings and tightened from the rear, which is why the grooves can follow an intentional orientation rather than behaving like ordinary front-tightened screws. Audemars Piguet’s own account of the first Royal Oak cases and eight hexagonal fittings is useful design context for this check.
Use a three-pass bezel inspection
- Shape pass: check that opposite bezel sides look parallel and that the eight corners have a consistent radius and bevel width.
- Surface pass: inspect whether the top brushing runs consistently and whether polished edges remain clean instead of bleeding into the brushed surface.
- Fitting pass: compare all eight grooves with the adjacent bezel edges. Look for one fitting that is visibly rotated, sits higher or lower, or leaves a different gap around its hexagonal seat.
Perspective can create false alarms. A phone held slightly to the left can make the right-side fittings look shorter or rotated. A groove that appears questionable in one image should move to “needs recheck,” not immediate rejection, until a straight-on close-up confirms it.
Clear rejection is appropriate when the second image still shows a fitting seated unevenly, an obviously incorrect groove orientation, a damaged slot, a deep mark on the bezel face, or a visibly inconsistent bezel gap. Those are physical issues, not lighting effects.
Bracelet Articulation, Finishing and Clasp Inspection
The integrated bracelet is not an accessory added after the case decision. It controls how the watch wraps the wrist, how wide it appears from above and how the brushed and polished surfaces continue away from the bezel. A strong dial cannot compensate for a bracelet that remains rigid, has inconsistent link gaps or closes poorly.
Check movement through the links, not only the front finish
Ask for the bracelet to be shown hanging in a natural curve and then laid flat. The first links should move without looking locked into one angle, while the remaining links should form a smooth arc rather than a series of abrupt steps. A short handling video is more useful than a still photo when link articulation is the main concern.
Follow the finishing from bezel to clasp
Start at the case-to-bracelet junction and follow the brushing down the center of the visible surfaces. Then check the polished accents at changing angles. The goal is not maximum shine; it is a controlled transition between finishes. Cloudy polished areas, wandering brush lines, rounded edges or one link with a different surface direction deserve a closer image.
Inspect the clasp as a function
Request one photo of the clasp open and one closed. Confirm that both sides meet evenly, the release components sit level, and the engraved or signed areas are clean enough to read without appearing excessively deep or rough. In video, the clasp should close positively without requiring visible force and should not reopen when lightly handled.
For everyday satisfaction, bracelet finishing and articulation often matter more than movement decoration because they are visible and felt every time the watch is worn. That does not make movement function optional: correct time, date and chronograph operation remain mandatory. Decorative caseback details come after exterior quality and reliable function in the approval order.
Movement and Function Checks by Reference Type
Function testing must follow the selected reference. A three-hand/date watch, a two-hand Jumbo-style watch with date and a chronograph do not share the same checklist. Do not request a generic movement video and assume it proves every function.
37 mm and 41 mm selfwinding directions
Ask for a continuous clip showing the crown positions, hand setting and date adjustment. Watch the minute hand as the crown is released; a large jump can make precise setting difficult. Confirm that the seconds hand moves without obvious contact and that the date display changes correctly. A seller should identify the actual movement and version separately rather than relying on a decorative caseback photo.
39 mm Jumbo-style direction
Verify the function set against the exact target reference before judging the dial. A 16202-style direction is visually defined by hours, minutes and date rather than a conventional central seconds hand. The QC request should therefore concentrate on correct hand setting, date operation, crown feel and the side profile, not reject the watch for lacking a function the reference does not use.
41 mm chronograph direction
Request one uninterrupted video that starts the chronograph, lets the hands advance long enough to show engagement, stops it and resets it. The central chronograph hand should return to its start position, and the relevant counters should respond according to the stated configuration. Also inspect the pushers from the side for consistent shape and seating. A reset problem, non-operating counter or function that differs from the declared reference type should not be approved on appearance alone.
Caseback decoration can be reviewed after these tests. Look for a rotor and bridges that appear clean, secure and consistent with the version being offered, but do not let engraved names or decorative stripes override a visible function problem. Movement decoration is a comparison detail; function is an approval requirement.
Avoid adding waterproof or performance assumptions to the approval. Confirm only what has been explicitly stated for the actual watch and follow the site’s separate support process for any testing or service claims.
The Correct Royal Oak QC Photo Sequence
Reviewing photos in a fixed sequence prevents one attractive macro shot from controlling the entire decision. Ask for the set in the order below and stop when the reference identity or basic geometry is wrong; there is no value in studying movement decoration on a watch that is not the requested configuration.
- Identity frame: one full-watch image with the stated reference direction, dial color and bracelet visible. Confirm that the watch matches the request before zooming in.
- Straight-on front: the dial and bezel should be parallel to the camera. Use this image for overall symmetry, marker placement and bezel geometry.
- Dial macro: request enough resolution to review Tapisserie rows, logo, minute track, markers, hand finish and date window without relying on digital enlargement.
- Bezel close-up: inspect all eight sides, the finishing boundary and all visible hexagonal fittings in one frame, followed by a second frame if perspective creates doubt.
- Left and right profiles: check total case stack, crown, pushers where applicable, bezel seating and the transition into the first bracelet links.
- Bracelet and clasp: include a natural hanging curve, the clasp open and the clasp closed. This shows articulation, finishing continuity and closure.
- Caseback: confirm the offered version, visible finishing and any marks only after the front and bracelet have passed.
- Function video: show crown operation, time and date setting, plus start-stop-reset for a chronograph. Keep it continuous enough to connect each action with the same watch.
Acceptable, needs recheck or reject
| Inspection point | Acceptable | Needs recheck | Reject or replace before approval |
|---|---|---|---|
| Reference identity | Requested reference direction, size, dial color and function layout are clearly shown | Listing title and QC label differ, or the size is not demonstrated | Wrong model, wrong dial, wrong function layout or a substitute not agreed in advance |
| Dial and date | Grid scale suits the reference, markers appear consistent and the displayed date reads cleanly | Angled photo, compressed crop, one questionable marker or a date numeral that needs a second example | Clearly crooked marker, damaged printing, visibly poor grid execution or persistent date misalignment |
| Bezel and fittings | Even geometry, consistent finishing and fittings that sit level with intentional groove orientation | Possible perspective distortion, reflection across one corner or one groove that needs a direct close-up | Uneven seating, damaged groove, deep bezel mark, incorrect orientation confirmed in a second image or visibly inconsistent bezel gap |
| Bracelet and clasp | Smooth link curve, consistent finish and a clasp that closes evenly | Protective film hides the surface, the bracelet is never shown flexing or the clasp is shown from one side only | Rigid or damaged link, severe finish mismatch, clasp misalignment or insecure closure |
| Functions | Declared functions operate in one continuous video and hands reset correctly where applicable | Video skips between actions, the date is not demonstrated or the chronograph test ends before reset | Non-operating function, failed reset, hand contact or a function set that does not match the declared reference |
| Photo coverage | Front, macros, both profiles, bracelet, clasp, caseback and required video are supplied | One essential angle is missing but can be requested before a decision | Approval is requested while key angles or the required function proof remain unavailable |
“Needs recheck” is not a polite form of approval. It means the current evidence is insufficient and a specific second photo or video must close the question. Keep each request narrow: ask for the bezel directly above, the clasp closed, or the chronograph reset. A new batch of unrelated photos can create more confusion.
The site’s separate QC Process explains the general pre-dispatch workflow. Use the sequence above for Royal Oak-specific judging.
Royal Oak Reference and QC Questions
Which Royal Oak size works best for a smaller wrist?
A 37 mm reference direction is normally the safest starting point because it reduces bezel and dial spread while keeping the integrated bracelet. A 39 mm Jumbo-style direction can also work when the wearer wants that specific profile, but approval should include a wrist-angle image showing that the first links do not overhang. Choose 41 mm only when stronger wrist presence is intentional.
Why does bezel screw alignment matter on a Royal Oak?
The visible hexagonal fittings are part of the Royal Oak’s front geometry, so one rotated groove or unevenly seated fitting interrupts the pattern immediately. Judge alignment from a straight-on photo and request a second angle before rejecting a watch, because camera perspective can make a correctly seated fitting appear off.
What should a buyer inspect on a Tapisserie dial?
Check that the grid scale matches the selected reference, that rows remain consistent near the edge, and that the pattern does not look blurred or compressed. Then inspect the 12 o’clock marker, opposite marker pairs, logo, minute track, hand clearance and date window. For a chronograph, also check how the grid meets each counter.
Is bracelet finishing more important than movement decoration?
For visible daily quality and comfort, bracelet articulation, brushing, polished accents and clasp closure usually have greater practical impact. Movement function is still mandatory, but decorative caseback details should be judged after the exterior and all required functions have passed.
Which QC photos are essential before approving a Royal Oak?
Request a full identity frame, a straight-on front, a dial macro, a bezel close-up, both side profiles, the bracelet in a natural curve, the clasp open and closed, and the caseback. Add a wrist-angle image for fit and a continuous function video for date setting or chronograph start-stop-reset.
Final Royal Oak Approval Checklist
Approve only after all seven lines below have a clear answer. A strong result is not the watch with the most impressive single photograph; it is the watch that matches the requested reference and closes every reference-specific question without relying on assumptions.
- Reference confirmed: the exact 37 mm, 39 mm or 41 mm direction, dial color and function layout match the request.
- Wrist presence confirmed: wrist circumference and a wrist-angle view support the intended discreet, balanced or strong fit.
- Dial approved: the correct Tapisserie scale, markers, logo, hands and date window pass a straight-on and macro review.
- Bezel approved: octagonal geometry, finishing boundaries, fitting orientation and seating remain consistent in a direct image.
- Bracelet approved: first-link drop, full-link articulation, surface transitions and clasp closure are shown clearly.
- Functions approved: time, date and any chronograph actions appropriate to the reference are demonstrated without an unresolved fault.
- Evidence complete: every item marked “needs recheck” has been answered by the requested second photo or continuous video.
Before requesting the corresponding QC set, send three pieces of information together: the exact reference direction, your wrist measurement, and the three details you care about most. For example: “16202-style, 16.5 cm wrist, priority on side profile, Petite Tapisserie and bracelet articulation.” That message produces a more useful review than asking for the best factory in general.
Use the table above to choose the reference, then keep the seven approval points beside the QC photos. Do not approve while one of your three priority details remains hidden or ambiguous.
Send Reference, Wrist Size & 3 QC Priorities